Pose Estimation
This was a project done to develop a workflow for building AR pose estimation models. I started this in late 2021 and completed it in early 2023, working on/off with long breaks. While the end result is a somewhat successful cup tracking demo, I have decided to end my research and development into pose detection for reasons that I will discuss below.
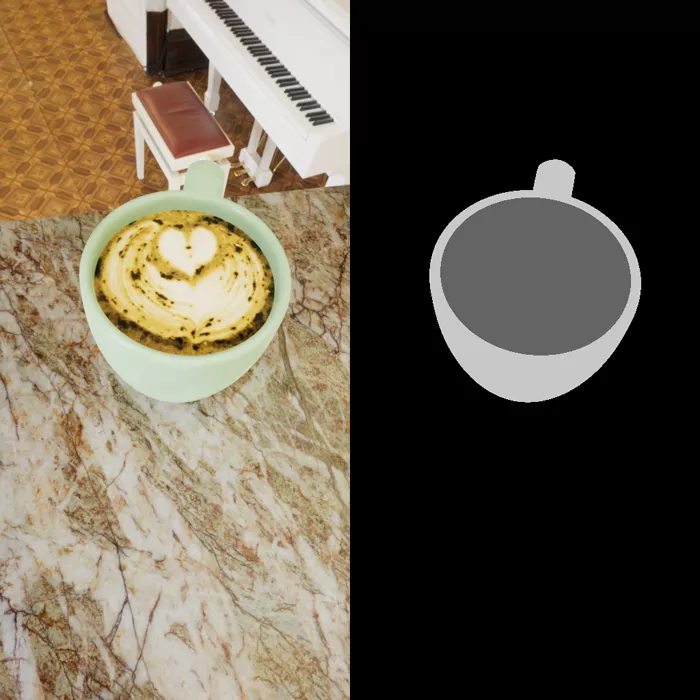
Final model running real-time on my iphone 12:
Neural Network Architecture
The project started with research into ML architectures for pose estimation with a focus on high performance as I intended to deploy my models for real-time applications on mobile phones. This was also my first experience with ML development so I learned pytorch and other general neural network (NN) / computer vision (CV) concepts. I quickly learned the two most common implementations for pose estimation:
- Use a standard 2D keypoint detection model with your object class, and then post-process the ML output with a Perspective-N-Point (PNP) solving algorithm to obtain the object pose (I call this method 2D+PNP).
- Train the ML model to directly output the transformation matrix of your object relative to the camera position/rotation (I call this method 3DTM).
There are pros and cons to each approach. There is more literature regarding 2D keypoint detection convolution neural networks (CNNs), so they're relatively easy to implement. This is intuition on my part, but 2D keypoint models also output more data (assuming you have at least 5 keypoints) than 3DTM models, and if one keypoint prediction is poor, the other predictions can compensate, resulting in a more stable output. The main disadvantage of 2D+PNP architectures is when your object class has variable relative distances between keypoints (e.g. different wheelbase on cars or different wing/fuselage length on planes). PNP algorithms require constant relative keypoint positions to solve accurately. 3DTM on the other hand can theoretically handle classes with variable dimensions. 3DTM architectures are however more novel in the literature as of writing this article. Implementing 3DTM was beyond my knowledge level so ultimately I chose 2D+PNP for the simplicity.
The next step was choosing a NN backbone. Backbones are reusable, common elements in NNs that can be used for different applications. I chose MobileNetV3 as it targets mobile devices, but if I had more patience and determination, it would have been nice to try a few other backbones. MobileNet is a feedforward network, which is a term I wish I had known much earlier in my design process. Feedforward networks calculate predictions for each frame independently, which results in significant temporal jitter in the predictions when using it on video inputs. Had I known this earlier, I would have experimented with recurrent networks, but maybe that would have been too complicated for beginners anyway.
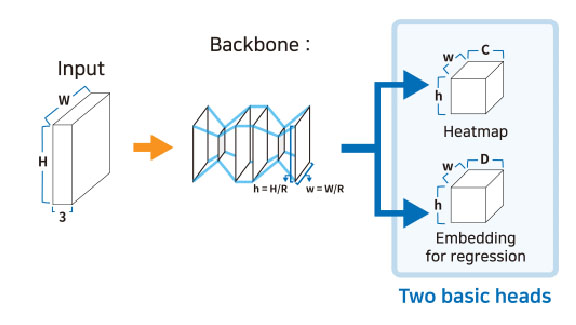
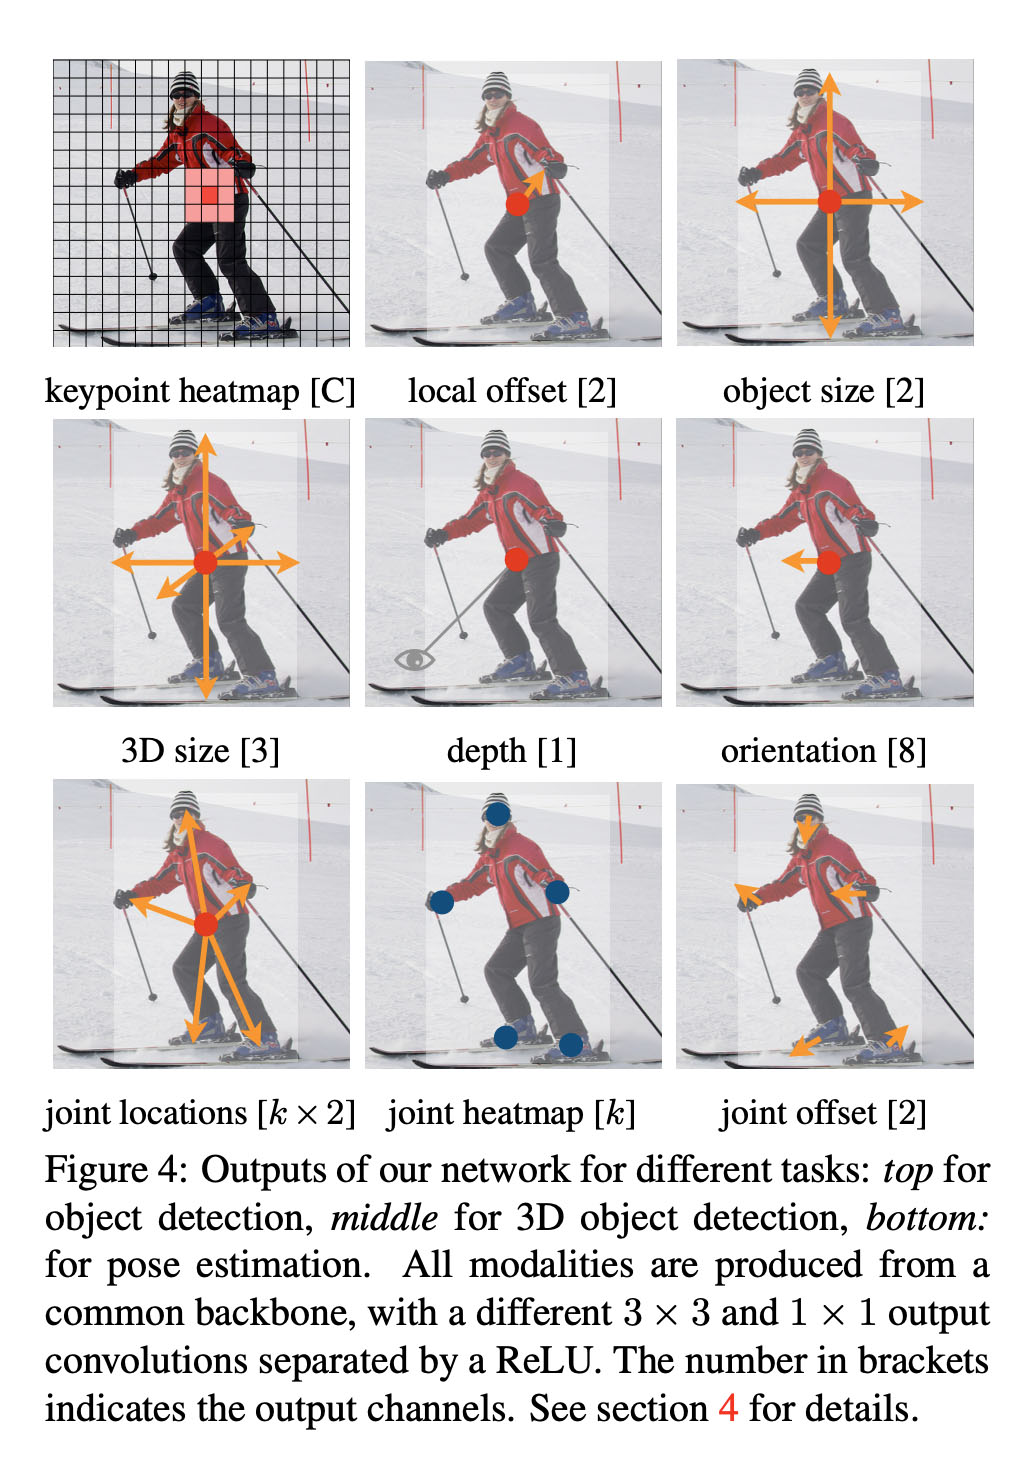
To the backbone, you can attach custom heads that have your desired outputs.I chose an output architecture called CenterNet for my 2D keypoint predictions. This approach has one head for classification; It outputs a low resolution heatmap that represents the confidence of your object class being centered at that location. The second head has an array of 2*k length vectors per heatmap point which stores the coordinates of your keypoints. I chose centernet primarily because it's easy to implement and an easy to understand architecture. If I ever wanted to switch to 3DTM, it would be easy to do with centernet. The second head would simply output the transform matrix instead of the 2D keypoints.
CenterNet architecture diagram:
CenterNet example outputs for various tasks:
Model Development
I trained my first 2D keypoint model on an open source door dataset. The predictions were poor, but this helped me gain more insight into what makes a good dataset. I realized that 'door' may have been too generic of an object class. If I had to classify what I actually wanted my model to detect, it would be "an architectural door that is part of a building, meant for humans to walk through". The dataset contained garage doors, toilet stall doors, barn doors, etc. My model had many false positives on things that were 1:2 aspect ratio rectangles like windows, books, fridge doors, and cabinets. I also realized that sometimes, when key elements of a door are occluded (door handle, hinges), it's very hard even for a human to look at the single frame and classify if the image contains a door without additional context.
Example of door pose and class estimation at work. Notice in the second video how rectangular objects are being detected as doors:
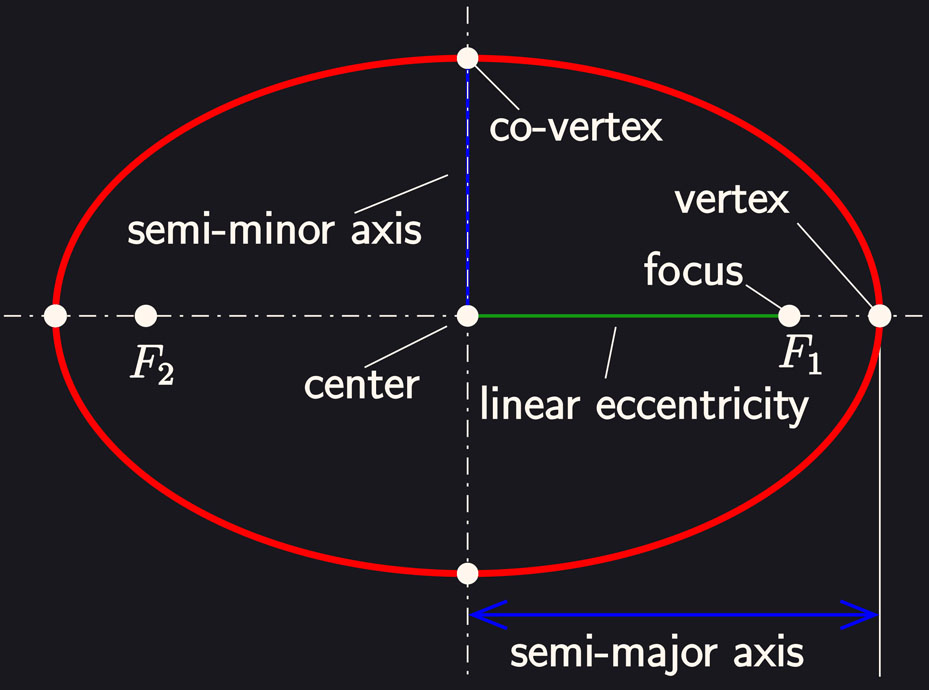
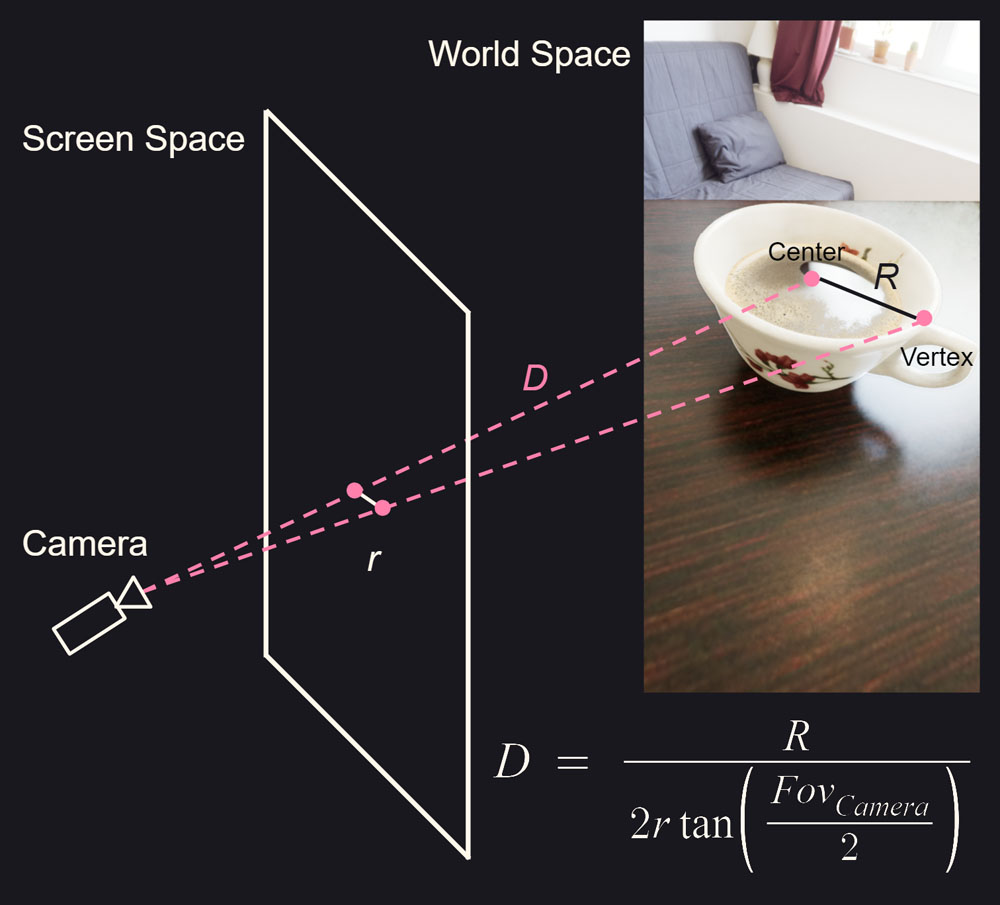
For my next experiment, I decided to better define my detection class and prediction scope. For the class, I chose cups, specifically opaque coffee/tea mugs with a handle. I wanted the model to only detect mugs placed on a table with the entire mug fully in frame, the way someone would take an Instagram photo of their latte. The cup would always be vertically oriented, which meant I could omit predicting rotation if I got the 'up' vector some other way. Luckily all phones have gyroscopes, so this was easy. I wouldn't even need PNP to predict the position and instead could use simple trigonometry. All circles projected onto a perspective camera form an ellipse unless they're perfectly collinear with the camera central view axis. I would predict 3 keypoints: the center of the cup opening and the two vertices of the ellipse on the cup rim. Cups have variable diameters, but this can be circumvented for my use-case. I would set a constant radius for my virtual cup and then use trigonometry to determine how far that cup would be from the camera given the 2D keypoint positions. This results in a virtual cup superimposed on the real cup in screen-space even if the positions and sizes in camera-space are different.
Ellipse notation (source: wikipedia):
Finding distance D from camera if screen space radius r and world space radius R are known:
Unfortunately, a dataset with such specific labels does not exist. I had two options: collect my own real-world data and label it (or pay someone to label it), or program a generator to create pre-labeled computer-generated images. The second option seemed more interesting lol. I started creating the generator in Blender, but after getting frustrated with Blender's Python API, I switched to Unreal Engine. The basic idea is to randomize the placement of a coffee cup in a scene, randomize the background HDR, randomize the table surface, cup mesh, liquid level, and liquid material. I would have liked to add teabags and spoons randomization in the cups as well, but the generator stage was taking too long. Based on my previous experience with door false positives on 1:2 rectangular objects, I was adamant to include cylindrical distractors into this dataset. I cut this feature for the same reason as the spoon, but my intuition was correct. The final model tends to give false positives on plates, circular speakers, and other circular objects. I used an Unreal Engine plugin to save each frame. Each randomization saves the RGB image and a mask image of the cup opening. The position of ellipse center + vertices (c, v1, v2) are calculated by applying the OpenCV contour/fit ellipse functions on the mask image.
Examples of generated data:
With 3000 frames generated (completely arbitrary number but I figured 3000 frames was more than enough to cover every permutation my generator allowed) and a jupyter notebook written, I could train my model. My computer at the time was pretty old so I decided to train using Google Collab pro. Collab pro is nice for speed but also setting up a consistent and repeatable Python environment. The end result was a model with very good true positive predictions, but also a decent number of false positives on circular objects as mentioned before. The regression head doing the 2D keypoint position estimation was very rough. I could improve this by adding additional heads for each of the keypoints (this is the recommended implementation for keypoint detection in the centernet paper) but I wanted to wrap this project up by the time I got here.
To make the model usable, the raw ML output needs post processing. I came up with some simple conditional validations that can be done on my top confidence predictions:
- The three keypoints c, v1, v2 should always connect via a straight line. I calculate the angle between c-v1∠c-v2 and reject any predictions that fall outside the 175-185 degree range.
- Distance from c-v1 and c-v2 should roughly be equal
Conclusion
I'm proud of my accomplishment with very little outside help; however, the amount of work required to improve performance is too high. Debugging pytorch and training notebooks is also not pleasant. It was particularly annoying for this project because I was making my notebook in parallel with generating my data. I did not validate my notebook against a standard dataset or write any unit tests and as a result, it's difficult to know if issues are caused due to my training setup or my dataset.
If you're just getting started with machine learning, I would recommend focusing on just the training part. Find a popular open source dataset that has the labels and classes you need like COCO. If you need niche labels/classes, I would switch your first experiments to common labels/classes. That way you can validate your model against papers that use the same dataset.
If you're interested in getting started with synthetic data, I think Unreal is a good place to start. Saving segmentation masks is very easy with the Unreal plugin I used. Saving keypoint and 3D labels is also fairly easy with Unreal JSON blueprint nodes. Make sure to have a clear scope for your classes and use case. The larger the dataset scope, the more complex your generator will be. Creating complex generators can be a significant undertaking. My current employer as of writing this article provides a bespoke synthetic data service. Their generator capabilities far exceed the cups project.
That's all I have left to say on this topic. Thanks for reading and feel free to reach out if you need any help :)
Now i have a friend pic.twitter.com/6zsYc6kxSQ
— Sava (@SavaForNow) February 6, 2023